If you read my previous post, time has passed since then. I have ditched my Raspberry Pi 3B+ and Hassbian for a dedicated Intel NUC with Proxmox and Hass.io 1. But this is not the subject of this post.
With my love to automate things, I was looking for a way to generate a base Ubuntu image for Proxmox to use it later on with Ansible for severals VMs (Home-Assistant is just one example).
Introduction
Packer is here to help. Packer will generate a base image usable in Proxmox as a template. To make it easier, Packer has a Proxmox builder for six months now.
Packer will use the builder to contact Proxmox to start a new VM and launch the setup from the boot command. When the setup is done, it’s possible to execute some additional tasks with several provisioners.
Proxmox
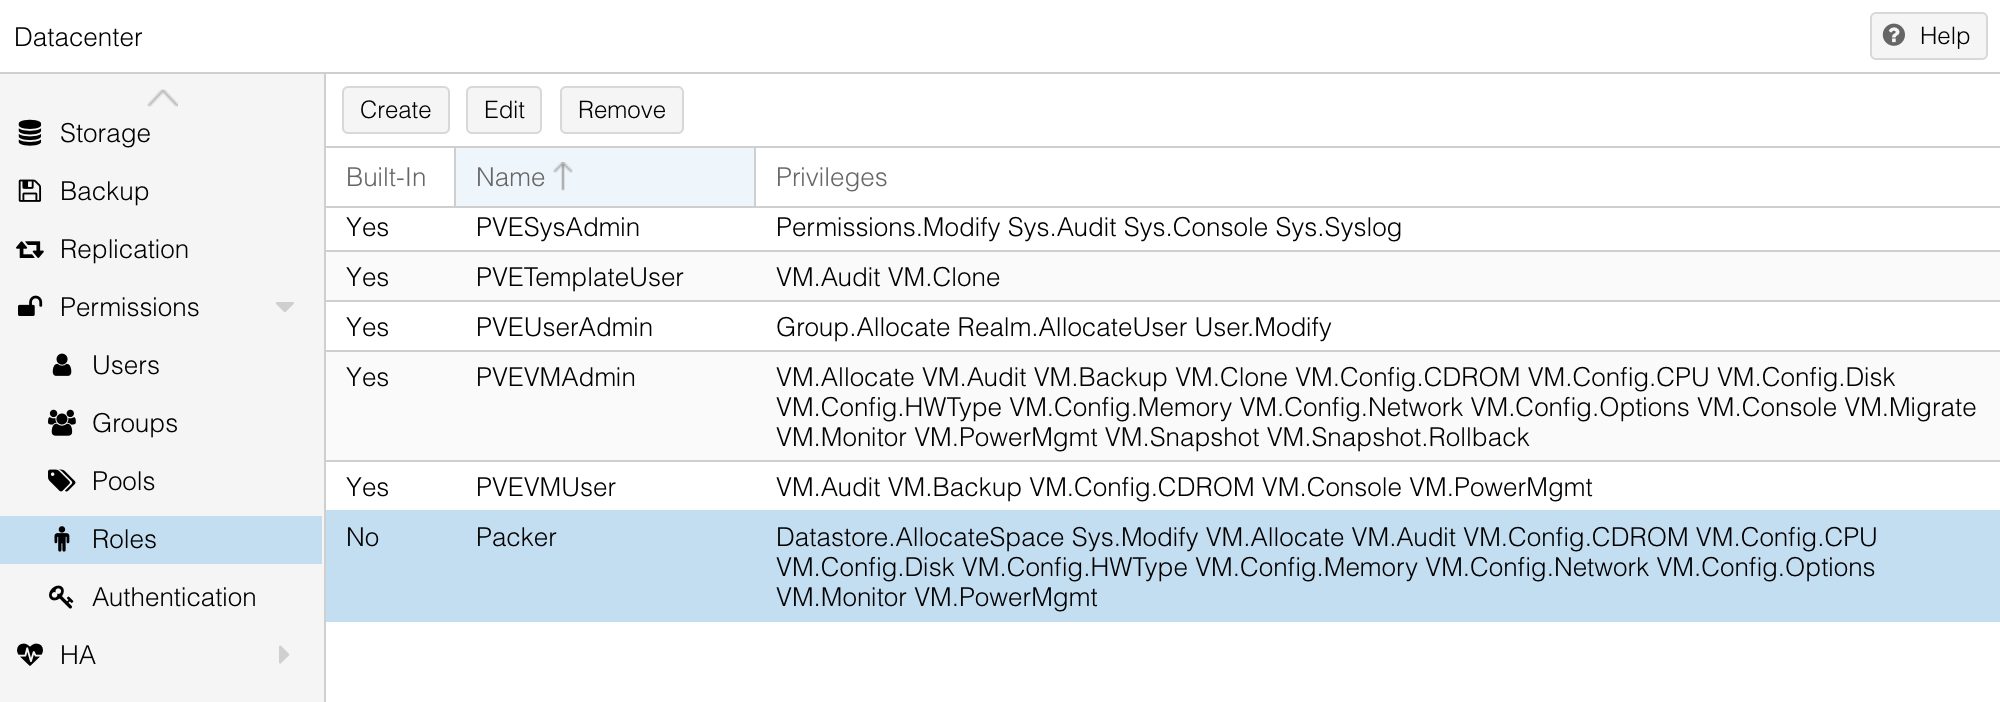
The first thing is to create a dedicated user for Packer in Proxmox. In the datacenter view on your Proxmox web-interface, create a new role Packer with the following privileges (all privileges are required).
- Datastore.AllocateSpace
- VM.Audit
- VM.Allocate
- VM.Config.CDROM
- VM.Config.CPU
- VM.Config.Disk
- VM.Config.Memory
- VM.Config.Network
- VM.Config.Options
- VM.Config.HWType
- VM.Console
- VM.PowerMgmt
- VM.Monitor
- Sys.Modify
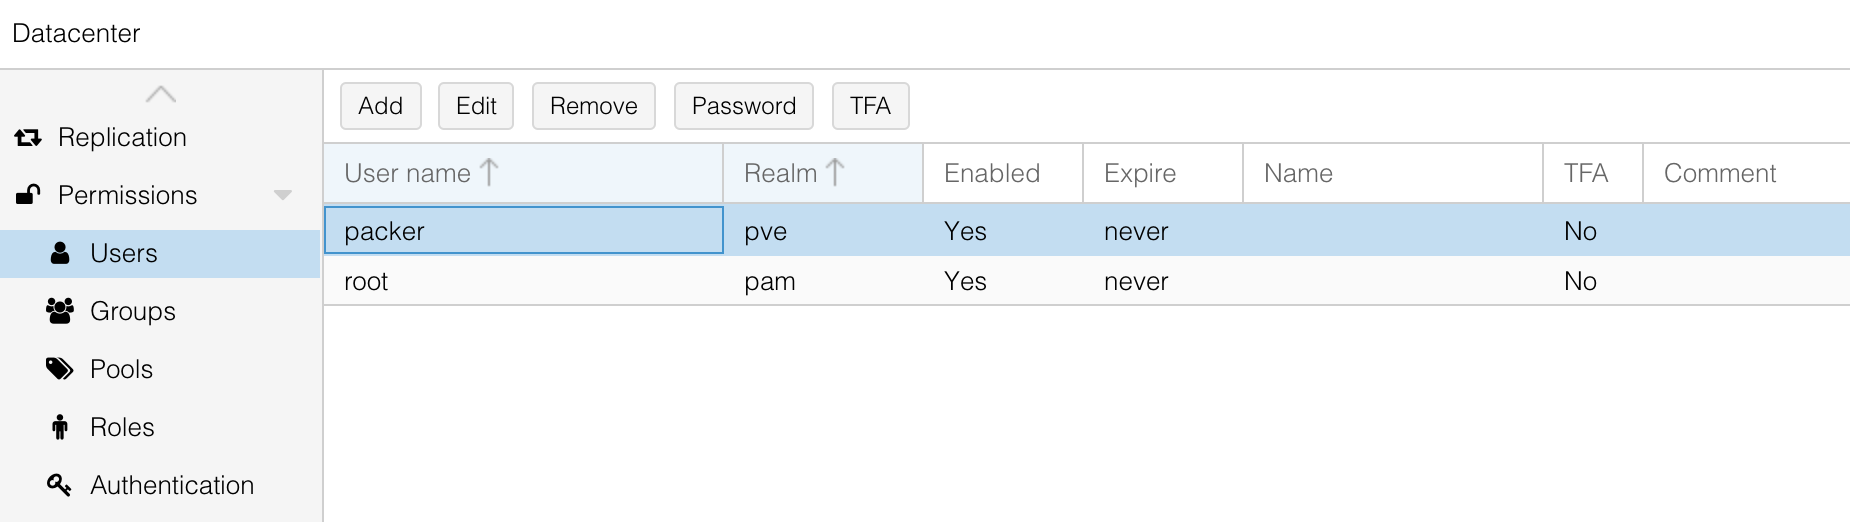
After that, create a new Packer user. For me, I’ve created it inside the Proxmox VE authentication server realm so the username will be packer@pve.
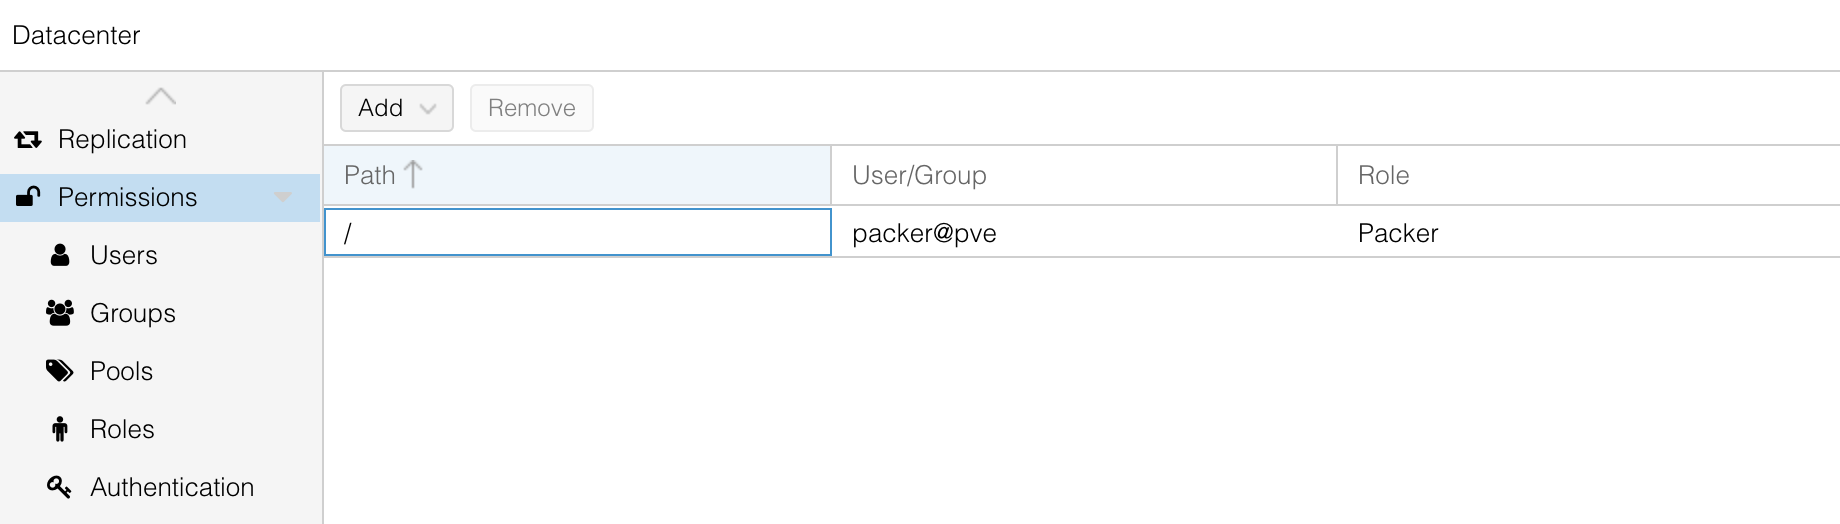
And to finish, link the user and the role to the main path / in the Permissions section.
Packer
Download the latest Ubuntu Server 18.04 from the official website. Put the image inside an iso folder in the local storage in your Proxmox cluster.

Packer needs a JSON configuration file to work with two main sections: builders and provisioners. Builders will be responsible to start the VM and launch the preseed configuration and provisioners to execute additional tasks into our running VM at the end before generating the template.
{
  "builders": [{
    "type": "proxmox",
    "proxmox_url": "https://proxmox.madalynn.xyz/api2/json",
    "username": "{{ user `proxmox_username` }}",
    "password": "{{ user `proxmox_password` }}",
    "node": "proxmox",
    "network_adapters": [{
      "bridge": "vmbr0"
    }],
    "disks": [{
      "type": "scsi",
      "disk_size": "20G",
      "storage_pool": "local-lvm",
      "storage_pool_type": "lvm"
    }],
    "iso_file": "local:iso/ubuntu-18.04.6-server-amd64.iso",
    "unmount_iso": true,
    "template_name": "ubuntu-18.04",
    "http_directory": "config",
    "boot_command": [
      "<esc><wait><esc><wait><enter><wait>",
      "/install/vmlinuz ",
      "initrd=/install/initrd.gz ",
      "preseed/url=http://{{ .HTTPIP }}:{{ .HTTPPort }}/preseed.cfg ",
      "auto=true ",
      "priority=critical ",
      "-- <enter>"
    ],
    "ssh_username": "madalynn",
    "ssh_password": "madalynn"
  }
]}
The username and password for the Proxmox connection will be store in another JSON file (that you can gitignore).
{
  "proxmox_username": "packer@pve",
  "proxmox_password": "fQk9f5Wd22aBgv"
}
The previous configuration will create a new VM template named ubuntu-18.04 based on ubuntu-18.04.6-server-amd64.iso with a 20G disk. Proxmox will try to load and execute a preseed file from an HTTP endpoint (started by Packer during the provisioning).
The preseed file will be responsible to configure every aspects of your VM (from the keyboard to the disk partitions or even the user creation…). It’s a text fle with several instructions to specify what need to be configured.
The preseed.cfg file needs to be locally inside the config directory (or you will need to update the field http_directory in the JSON configuration).
.
├── config
│   └── preseed.cfg
└── ubuntu.json
Here is an example of what the file looks like.
# LOCALE
d-i debian-installer/locale string en_US

# KEYBOARD
d-i console-setup/ask_detect boolean false
d-i keyboard-configuration/layoutcode string fr

# USER
d-i passwd/user-fullname string Madalynn
d-i passwd/username string madalynn
d-i passwd/user-password password madalynn
d-i passwd/user-password-again password madalynn

# APT
d-i mirror/protocol string http
d-i mirror/country string manual
d-i mirror/http/hostname string fr.archive.ubuntu.com
d-i mirror/http/directory string /ubuntu
d-i mirror/http/proxy string

# TIMEZONE
d-i time/zone string Europe/Paris

# LVM
d-i partman-auto/method string lvm
d-i partman-auto/disk string /dev/sda
d-i partman-auto-lvm/guided_size string max
d-i partman-auto/choose_recipe select atomic

d-i partman-lvm/confirm boolean true
d-i partman-lvm/confirm_nooverwrite boolean true

d-i partman-partitioning/confirm_write_new_label boolean true
d-i partman/choose_partition select finish
d-i partman/confirm boolean true
d-i partman/confirm_nooverwrite boolean true

# PACKAGES
d-i pkgsel/include string openssh-server qemu-guest-agent
d-i pkgsel/upgrade select full-upgrade

# END
d-i finish-install/reboot_in_progress note
If you wan to learn more about preseed files, Ubuntu has a full documentation on this subject.
The process creation can be launch with the following command.
packer build -var-file=secrets.json ubuntu.json
At the end of the process, the VM template will be fully configured (packages are up to date, the LVM partition is created) and an user account will also be created (madalynn/madalynn).
Ansible
At this step, the template can be used for new machines. Just clone the template, give it a name and voilà. However, the VM cannot be used in Ansible directly. Some extra configuration is needed to allow Ansible to connect to it with a SSH key and also to be able to run sudo commands without passwords.
This is where Packer provisioners will help. Provisioners are a way to execute commands inside our VM from different methods. Two provisioners will be use: shell and ansible. The first one will execute a script to edit the sudoer configuration for our new custom user (to please Ansible). The second will execute an Ansible playbook to finish the configuration.
{
  ...
  "provisioners": [{
    "type": "shell",
    "execute_command": "echo 'madalynn' | {{ .Vars }} sudo -S -E bash '{{ .Path }}'",
    "script": "scripts/setup.sh"
  }]
}
The command launch the script with sudo and give the user’s password from the input. It’s possible to use variables to simplify writing. The full list is available in the documentation.
The bash script is very simple and will just put a new file inside /etc/sudoers.d to allow the user to use sudo commands without entering any password.
#!/bin/bash

set -eux

# Enable "madalynn" user sudo without password
echo "madalynn ALL=(ALL) NOPASSWD: ALL" > /etc/sudoers.d/madalynn
The second provisioner will launch an Ansible playbook to add the public key for the madalynn user and also to update all packages on the VM. It’s possible to do the same with a bash script but it is much simple with a playbook (and the goal is to enable Ansible no?).
{
  ...
  "provisioners": [{
    ...
  }, {
    "type": "ansible",
    "playbook_file": "./ansible/provisioning.yml"
  }]
}
The playbook file consists of two tasks. The first one update all packages to the latest version. The second one will push the public key used later by Ansible
- hosts: all
  tasks:
    - name: Update all packages to the latest version
      apt:
        upgrade: dist
        autoremove: true
      become: true
    - name: Add public SSH key for the Madalynn user
      authorized_key:
        user: madalynn
        key: ssh-ed25519 AAAAC3NzaC1lZDI1NTE5AAAAIIncmwjiCyDLFn515hRl4TgmKcoFyxnTkROKl3OI1jFB
        state: present
        exclusive: true
And that’s it! VM generated from the template can be used directly in Ansible with the madalynn user.
All files can be found in aerialls/madalynn-packer GitHub repository.
Hassbian is now dead so a choice was to be made. ↩︎